Solar Panels on a House: Where to Put Them and What Angle to Use
Introduction
Two identical solar arrays installed on two neighbouring houses can produce noticeably different amounts of energy per year. The reason is almost never the panels themselves — it is where and how they are mounted. Orientation, tilt, shading, and roof geometry can swing annual output by 30 % or more, which is the difference between a 6-year payback and a 10-year one.
This guide is not a general “what are solar panels” overview — we already cover that in the main solar panels article. Here we focus entirely on placement: how to read your roof, pick the best surface, work out the right angle, and adapt all of this to the latitude and climate you actually live in.
What “Placement” Actually Means
When installers talk about placement, they mean five separate decisions, each of which matters independently:
- Location — roof-mount, ground-mount, carport, or wall
- Azimuth (orientation) — the compass direction the panels face
- Tilt — the angle between the panels and the horizontal plane
- Shading — what sits between the sun and the panels at each hour and season
- Array layout — how individual modules are grouped into strings
Getting azimuth and tilt roughly right is worth more than buying premium panels. Getting shading wrong can destroy the output of an otherwise perfect system.
How the Sun Moves Over Your Roof
Solar energy scales with two things: how directly sunlight hits the panel (angle of incidence) and how many hours of unobstructed light reach it. Those two quantities depend on three constants of your site:
- Latitude — determines the sun’s average height above the horizon
- Hemisphere — determines which way panels should face (south in the northern hemisphere, north in the southern)
- Horizon profile — the silhouette of buildings, trees, and terrain around your property
On 21 June at noon in Madrid (40° N), the sun is 73° above the horizon. On 21 December at noon in the same spot, it is only 26° up. A panel fixed at one angle must compromise between these extremes — which is where latitude-based tilt rules come from.
Roof Scenarios and How to Handle Each
Pitched Roof Facing the Equator (Best Case)
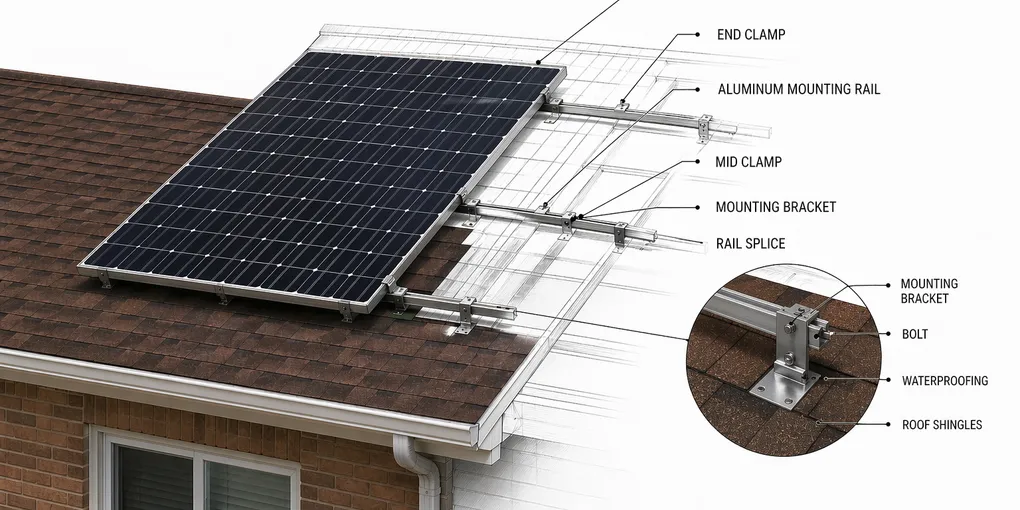
A south-facing (in the northern hemisphere) pitched roof with a slope between 25° and 45° is close to ideal. Annual output is typically 95–100 % of the theoretical optimum. Installation is straightforward: panels are mounted flush with the roof on rails, no tilt legs needed.
Practical tip: Accept a slightly sub-optimal tilt (say 30° when 35° would be perfect) rather than add tilt frames on a pitched roof. The wind load, visual impact, and cost rarely justify the 2–3 % gain.
Pitched Roof, East–West Split
A very common situation in dense suburbs where the house axis runs north–south, leaving you with two slopes: one facing east, one facing west. Old advice was “skip it”. Modern advice is “install both sides”:
- Each side produces ~85 % of what a south-facing array would
- Combining both gives you a flatter production curve across the day — more power in the morning and evening, less of a midday spike
- This matches household consumption better if you use electricity early and late (coffee, laundry, cooking)
Use a single hybrid inverter with two MPPT inputs, or separate string inverters — never wire east and west modules into the same string.
Flat Roof
Flat roofs give you the most freedom — you choose the azimuth and tilt yourself. Two mounting options:
| Mount type | Tilt | Spacing | Wind load | Typical yield |
|---|---|---|---|---|
| Single-tilt south | 25–35° | wide rows to avoid self-shading | high | 100 % (reference) |
| East–west (A-frame) | 10–15° | panels almost touching | low | 85–90 %, but more panels per m² |
East–west layouts are very popular on commercial flat roofs because you can fit 30–40 % more panels per square metre, which more than offsets the lower per-panel yield. On a home, single-tilt south is usually better unless the roof is small.
Ballasted vs. penetrating mounts: If the roof membrane is under warranty or the structure can take extra dead load (15–20 kg/m²), use ballasted mounts (concrete blocks hold the racks down) to avoid piercing the membrane.
Ground-Mount
Ground-mount arrays are the default when the roof is too small, wrong-angled, or heavily shaded. They beat roof mounts on several fronts:
- Perfect azimuth and tilt regardless of house orientation
- Easy access for cleaning and maintenance
- Better cooling (5–10 % higher output in summer than roof-baked panels)
- Can support trackers (see “Future” section) — rarely cost-effective on a home
Downsides: they consume yard space (typically 8–10 m² per kW), require a concrete foundation or driven piles, and trenching for the DC run back to the house. Expect 15–25 % more installed cost than an equivalent roof array.
Carport / Pergola
A carport with solar panels as the roof kills two birds: shaded parking and a south-facing array at exactly the angle you want. Cost per installed kW is comparable to ground-mount. Watch for structural engineering — wet snow on a 5 × 8 m solar carport is no joke.
Wall Mount
Vertical panels on a south-facing wall work, but at ~70 % of optimal annual output in most of Europe and North America. They shine in winter — at low sun angles, vertical surfaces get nearly perpendicular light. Worth considering as a supplement (not main array) for off-grid homes in high latitudes where winter yield matters disproportionately.
Tilt Angle by Latitude
Rules of thumb for fixed arrays:
- Maximum annual energy: tilt = latitude − 5°
- Maximum winter energy: tilt = latitude + 15°
- Maximum summer energy: tilt = latitude − 15°
A quick reference for common latitudes:
| Latitude | Example city | Optimal year-round tilt | Summer | Winter |
|---|---|---|---|---|
| 25° N | Miami / Dubai | 20° | 10° | 40° |
| 35° N | Tokyo / Atlanta | 30° | 20° | 50° |
| 45° N | Milan / Minneapolis | 40° | 30° | 60° |
| 55° N | Copenhagen / Edinburgh | 50° | 40° | 65° |
| 65° N | Reykjavík | 60° | 45° | 70° |
For most grid-tied homes, “latitude − 5°” is the right target. Off-grid houses that depend on solar in winter should bias higher (closer to latitude + 10°) because December is the limiting month.
Tolerance: Any tilt within ±10° of optimal loses less than 5 % annually. Don’t agonise over one or two degrees — get the shading right instead.
Reading Your Azimuth
Azimuth is the compass bearing the panel faces, measured from south in the northern hemisphere (or north in the southern). Optimal is 0° (true south in the north, true north in the south). Deviations cost:
| Azimuth offset from optimal | Annual loss |
|---|---|
| 0° (pure south) | 0 % |
| ±15° (SSE / SSW) | 1–2 % |
| ±30° (SE / SW) | 4–6 % |
| ±45° (ESE / WSW) | 10–15 % |
| ±90° (east or west) | 20–25 % |
Magnetic vs. true south: Your compass points at magnetic north, which can differ from true north by 0–20° depending on where you live (called “magnetic declination”). Look up declination for your city and correct your reading. For PV purposes, a mistake of 5° in azimuth costs less than 1 %, so rough is fine — but don’t confuse magnetic and true when your roof is already off-axis.
Shading: The Silent Killer
Unlike orientation and tilt, where errors compound linearly, shading can be non-linear: a single shadow across one cell can reduce the output of an entire string by 30–50 % due to how panels are wired internally.
What Casts Problem Shadows
- Trees (especially deciduous — they leaf out exactly when you want the energy)
- Chimneys, vent pipes, roof dormers
- Satellite dishes, HVAC units
- Neighbouring buildings (check their roof lines at winter noon)
- Future construction you cannot control
How to Analyse Shading Before You Commit
- Photo method: Take panoramic photos from the exact panel location at 9:00, 12:00, and 15:00 on a clear day. Obstructions visible in these photos will shade the array at those hours.
- Solar Pathfinder / Horicatcher: A dome mirror or fisheye camera that overlays the sun’s path for every day of the year on a single image. Installer-grade accuracy.
- Free online tools: PVGIS (Europe/Africa/Asia), NREL PVWatts (worldwide), Google Project Sunroof (US/UK/FR). Enter your roof outline and orientation; you get monthly production estimates including shading from terrain (but not trees — add that manually).
- Drone survey: For larger roofs or if you want a certified shading report, drone-based 3D scans generate a full horizon profile in one afternoon.
Mitigations When You Cannot Eliminate Shade
- Module-level power electronics (microinverters or DC optimisers like Enphase, SolarEdge) — each panel operates independently, so one shaded module doesn’t drag down the string. Adds roughly $80–120 per panel.
- Split strings — keep shaded and unshaded panels on separate MPPT inputs.
- Strategic pruning — the cheapest fix; a single tree limb removed can recover 8–12 % annual yield.
Structural and Condition Checks
Before committing to a roof, answer these:
- Age of roof: If the roof is more than 15 years old, reshingle before installing. Panels last 25–30 years; you do not want to remove an array to replace a roof after 5 years.
- Material: Asphalt shingle, metal standing seam, concrete tile — all are installable. Slate and clay tile are trickier and cost 20–40 % more in labour.
- Load capacity: A typical residential array adds 15–20 kg/m². Roofs built to code in the last 40 years handle this easily; older or unusual structures may need reinforcement. Get a structural assessment for anything borderline.
- Penetrations: Count how many holes mounting rails will need; each is a potential leak point. Good installers flash every one.
Cost Implications of Placement Decisions
| Placement decision | Cost delta vs. standard south-facing roof-mount |
|---|---|
| East–west roof (both sides) | +5–10 % (extra rails, doubled string cabling) |
| Flat roof, ballasted | +10–15 % (tilt frames + ballast) |
| Ground-mount | +15–25 % (foundation, trenching) |
| Solar carport | +40–60 % (structural steel) |
| Microinverters / optimisers | +10–15 % (but regain most of it if shading is unavoidable) |
| Structural reinforcement | +5–20 % depending on severity |
How to Choose — Decision Walkthrough
Work through this in order. Stop at the first surface that passes all checks.
- Is there a roof slope facing within ±45° of the equator, unshaded between 10:00 and 15:00? → Use it. Stop.
- Do you have an east–west split roof with both slopes unshaded? → Install on both. Stop.
- Is the roof flat and structurally sound? → Ballasted south-facing tilt frames. Stop.
- Do you have 8 × 10 m of unshaded yard? → Ground-mount at optimal tilt. Stop.
- Can you add a carport or pergola on the south side? → Excellent option, budget permitting.
- Can you supplement with a south-facing wall mount? → Use only if winter output is critical.
Common Placement Mistakes
- Skipping the shading analysis — “the tree isn’t that big” costs more homeowners more money than any other single mistake.
- Forcing panels onto a bad roof because it’s the only roof — ground-mount exists; it is often cheaper per lifetime kWh than a shaded rooftop.
- Using one string across east and west slopes — guaranteed production loss; always separate MPPTs.
- Obsessing over a perfect tilt — ±10° from optimal is within 5 % of ideal.
- Ignoring self-shading on flat roofs — panels in rows must be spaced so the back row doesn’t shadow the front at winter noon. Rule of thumb: row spacing = 2.5 × panel height on a 30° tilt at 45° latitude.
- Placing the inverter in direct sun — inverters lose 0.5–1 % of efficiency per 10 °C above 25 °C. Mount them in shade or inside the house.
- Cheap mounting rails — failure in year 12 means you pay for a full teardown and reinstall.
Future: Trackers and Building-Integrated Solar
- Single-axis trackers follow the sun east-to-west through the day, adding 15–25 % annual yield. Rare on homes because moving parts introduce failure modes and cost $1 000–2 000 extra for a small system. More common on ground-mount installations in high-solar regions.
- Dual-axis trackers also follow seasonal sun height; gain another 5–10 % but cost even more. Not practical for homes.
- Building-integrated PV (BIPV): solar roof tiles (Tesla Solar Roof, GAF Timberline Solar), solar windows, solar cladding. Aesthetics are excellent; cost is 2–3× standard panels; efficiency is 10–20 % lower. Best when re-roofing anyway.
FAQ
Does the roof colour matter? Slightly. Dark roofs run hotter, which raises panel temperature and costs 1–2 % output in summer. Not a placement driver on its own.
Can panels face directly up on a flat roof (0° tilt)? Possible, but a bad idea: dust and pollen accumulate instead of washing off with rain, and winter output drops hard because low-angle sun grazes the surface. Use 10° minimum, even on flat roofs.
Is it better to have fewer panels facing south or more panels facing east and west? More panels almost always wins. Ten east–west panels at 85 % each produce more than seven south-facing panels at 100 %. Cost per watt is the ceiling, not orientation.
How much does snow matter for placement? Steeper tilts (45°+) shed snow on their own. Flatter tilts (< 20°) in snowy climates can lose 20–30 % of winter output to accumulation. If you are in a snow belt, bias tilt higher and keep the lower edge of panels clear of the roof eave so snow has somewhere to go.
Do I need planning permission for panel placement? In most of Europe, the US, and Canada, roof-mounted arrays on a primary residence are permitted development and need no special permission — with exceptions for heritage buildings and conservation areas. Ground-mount often needs a permit. Check locally before you design around a specific location.
Conclusion
The single most expensive mistake in a home solar project is treating placement as a detail. The panel you bolt to the roof is a commodity; the roof surface you choose determines 20 years of output. Start with a shading analysis, pick the largest unobstructed area that faces within 45° of the equator, aim for a tilt near your latitude, and split east/west strings onto separate MPPTs. Everything else is a rounding error compared to those four decisions.